If you’re a Windows 10 user, turn off these 3 important Windows 10 privacy settings to keep your personal information safe from Microsoft. According to Microsoft, enabling privacy settings is important for your system as it keeps your system in good performance mode by tracking your device, operating system performance, security, etc.
However, some settings are good for the health and security of your PC, but many of them are not ideal for your privacy. Because with these privacy settings, Microsoft fetches your personal information like browsing data, what apps you are using, what you are typing, etc., and tracks your movements in the internet world and Recommends different ads according to your preferences. So don’t worry, just follow the below steps to turn off these privacy settings.
How to prevent Microsoft from getting personal data?
Today’s Windows like Windows 10 and Windows 11 are much smarter than the previous versions. These operating systems always keep track of the device’s security, performance, error tracking, and other system services to keep it running smoothly. But these systems also track all your activity like which website you are browsing, what keywords you are searching, what kind of product you are buying online, what app/software you are using, even what you’re typing, and much more.
This means that Microsoft tracks you on their operating systems and they store your personal information on their servers. As a result, they show you various commercial ads based on this data. Then you probably don’t like this type of OS activity and don’t want Microsoft to get your private data. So to prevent this you need to make some changes in your Windows Privacy Settings.
Change Windows 10 Privacy Settings
To change privacy settings on Windows 10, click the Start menu and select “Settings” which will open the Settings window. Then click on the “Privacy” option to open the Privacy Settings page.
1) Disable targeted advertising
With these settings, Microsoft creates an advertising ID for you and tracks your app activity, and sends this information to this ID so that they can recommend relevant ads primarily based on your interests in the Windows Store.
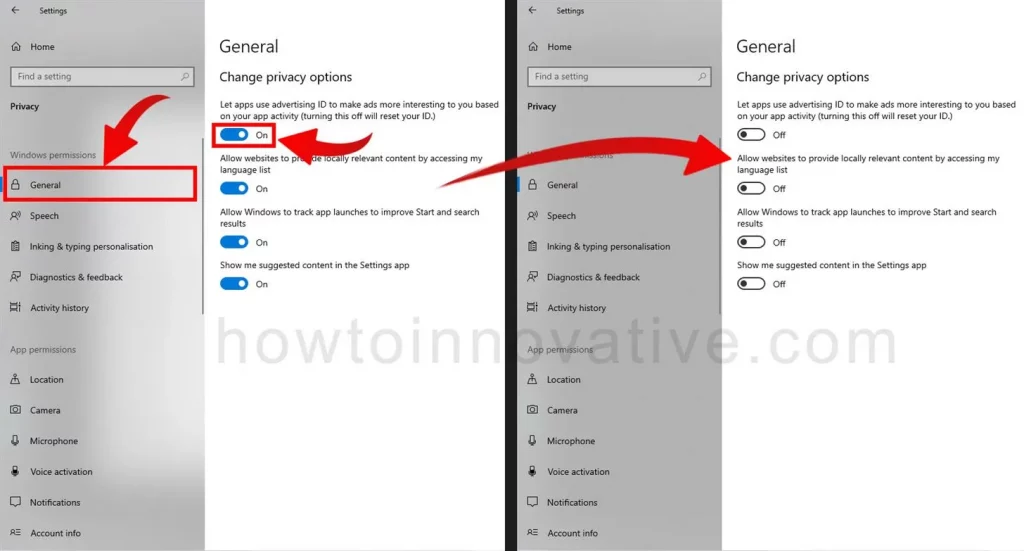
So to turn off this feature, select the General tab menu from the left sidebar in the Privacy Settings window. Then turn off the first toggle button from the “Change privacy options” section on the right. This will reset your ID. You can also turn off the rest of the options in this section to prevent various other trackings.
2) Stop sending diagnostic data
As you know, Windows 10 is smarter than previous versions, so to keep your system safe, error-free, and up-to-date, Microsoft fetches some important system diagnostic data which is very important and necessary by default.
But Microsoft wants to collect some optional diagnostic data like what website you are browsing, what keywords you are searching for, what kind of product you are searching online, what app you are using, etc. So if you don’t want to send this type of optional data to the Microsoft server, then follow the below steps.
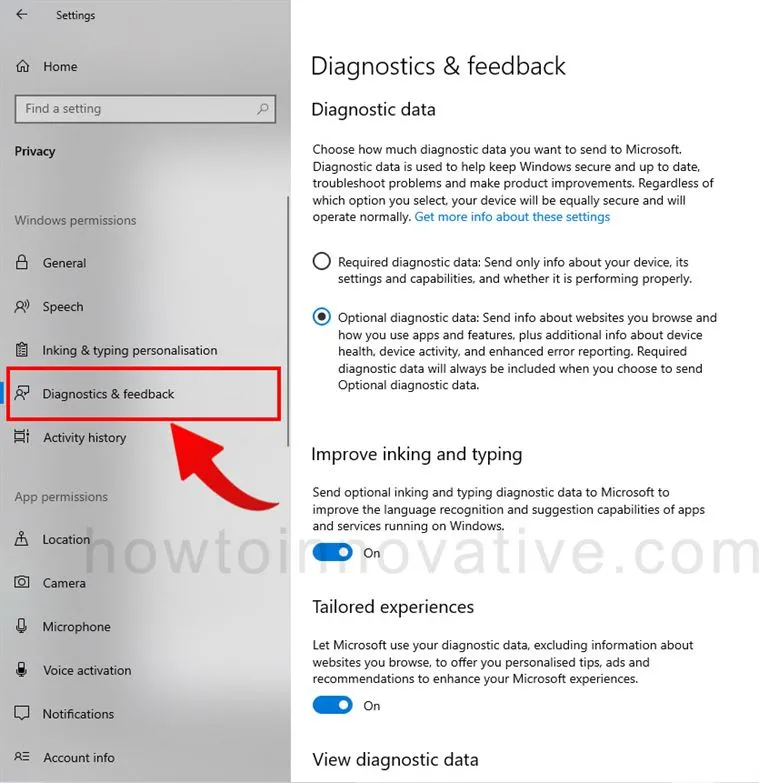
- In the Privacy Settings window, select the “Diagnostics and Feedback” tab menu from the left sidebar. This will open the “Diagnostics and Feedback” section on the right.
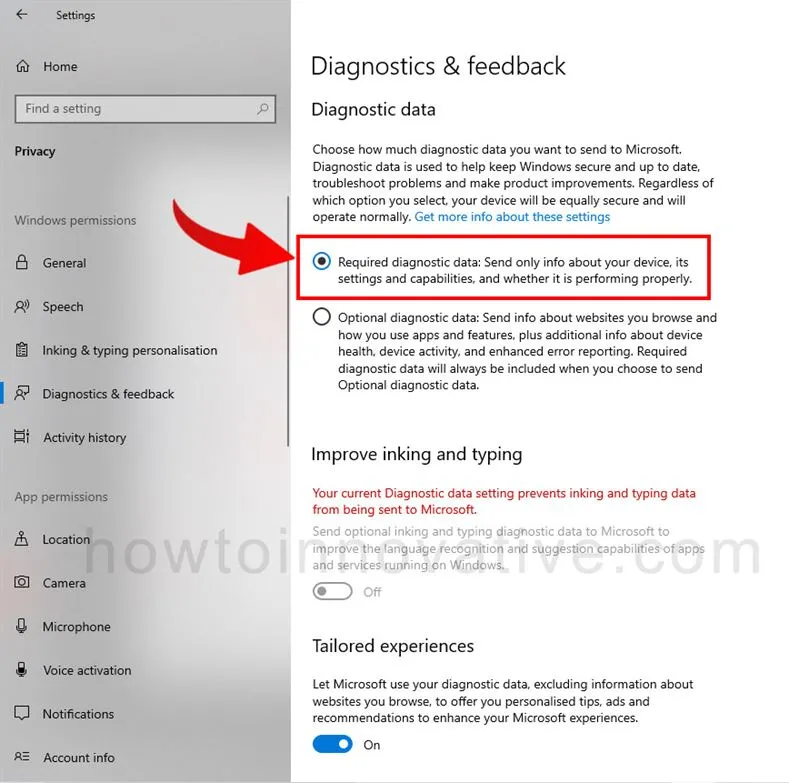
- Select the “Required diagnostic data” option from the “Diagnostic data” section, which will disable the “Improve inking and typing” option.
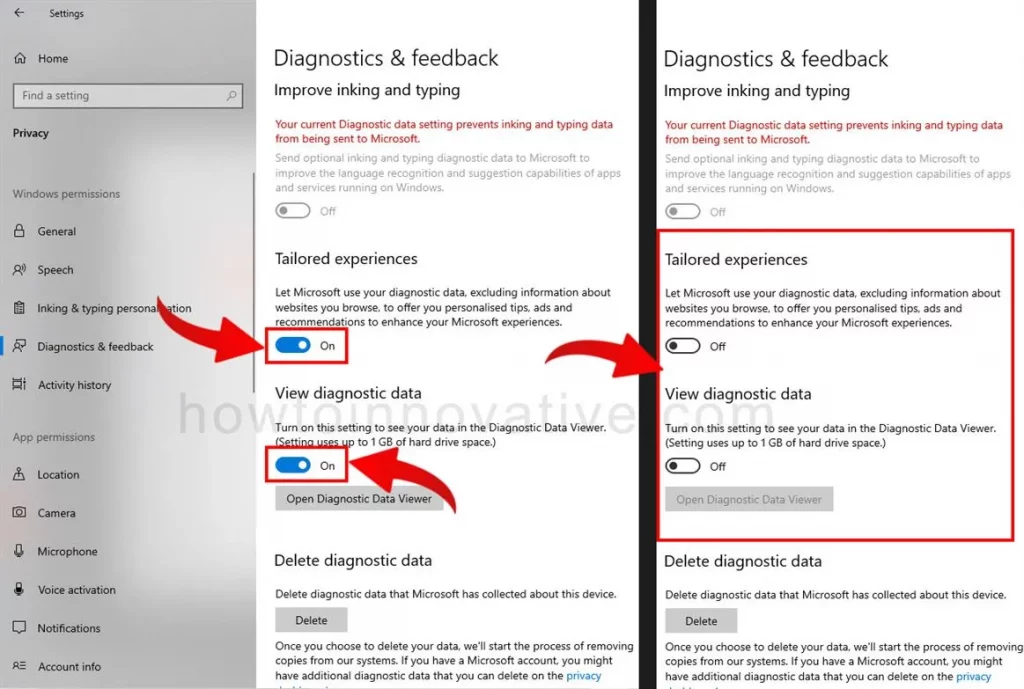
- In addition, you can turn off the rest of the toggle buttons at the bottom, which will disable the “Tailored experience” and “View diagnostic data” options, respectively. This will prevent Windows System from using your diagnostic data to offer you personalized tips, ads, and recommendations.
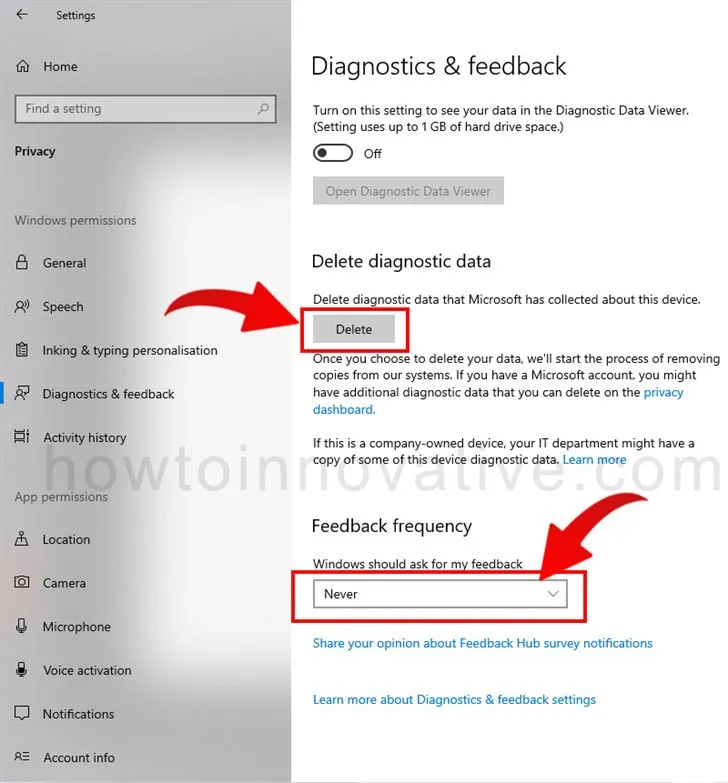
- If you want to delete the diagnostic data that Microsoft has collected so far, simply click on the “Delete” button from the “Delete diagnostic data” section. You can then optionally select “Never” from “Feedback frequency” to finish this step.
3) Turn Off Activity History
With the “Activity history” feature, the Windows 10 system actively monitors all your activities and stores them on its remote servers. Microsoft tracks your every move on your PC and the Internet world. This is quite unexpected for us.
So if you want to stop Microsoft from tracking all your activities and want to protect your privacy, follow the steps given below to turn it off.
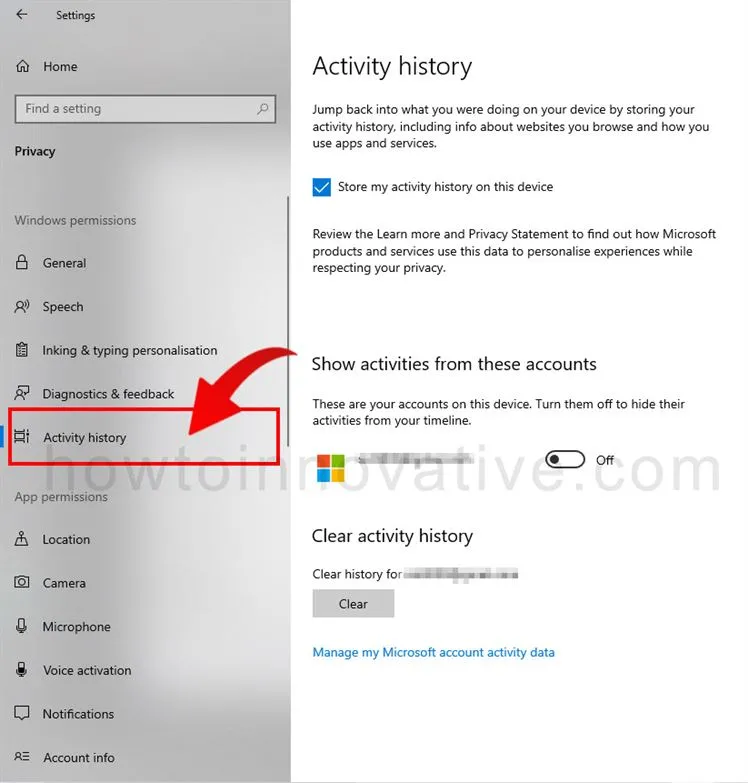
- In the Privacy Settings window, select the “Activity history” tab menu from the left sidebar which will open the “Activity history” section on the right pane.
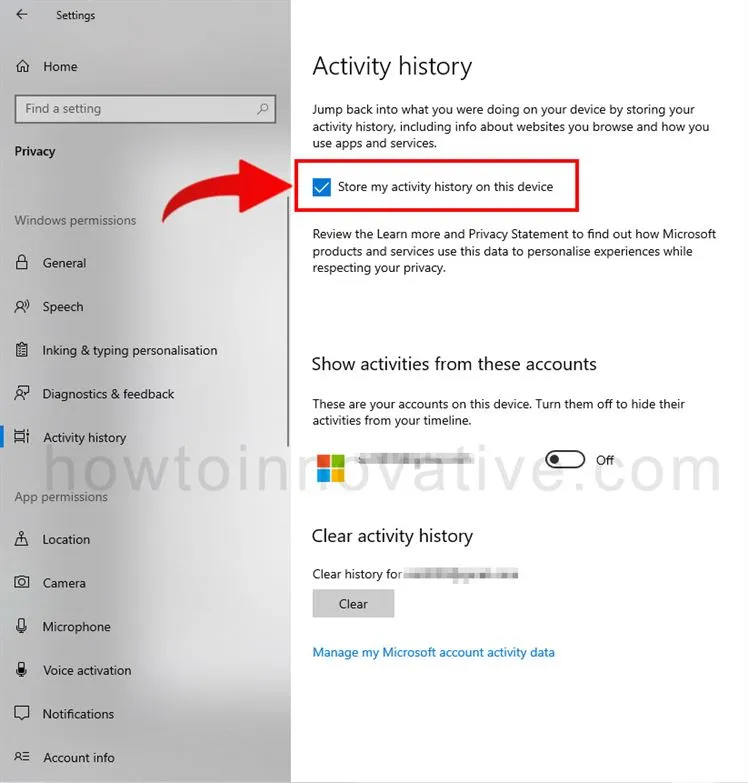
- Then uncheck the “Store my activity history on this device” option to prevent Windows 10 from storing all your activity on the cloud.
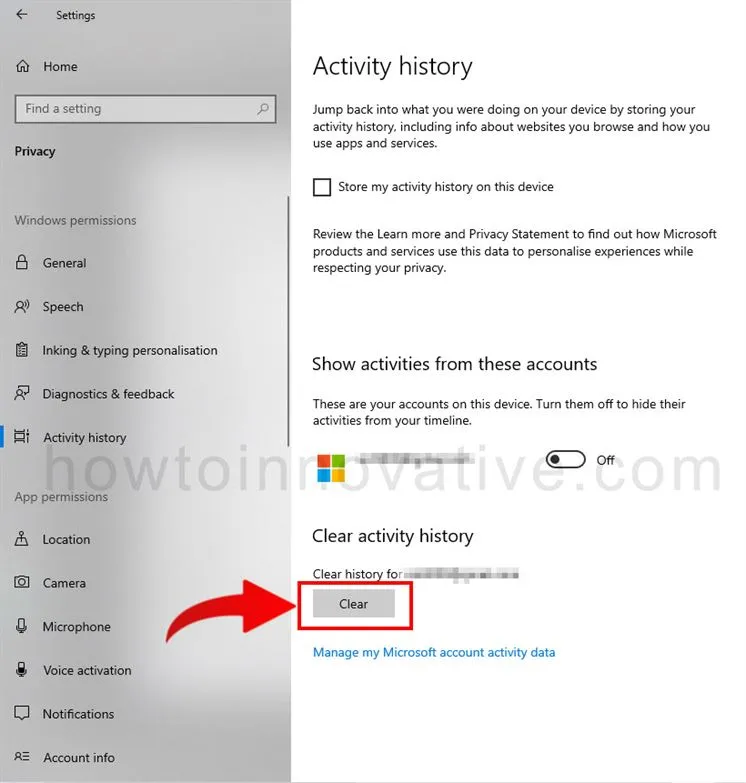
- Then click the “Clear” button from the “Clear activity history” section below to delete all previous activities from the Microsoft servers.
FAQ.
How do you stop Windows 10 from collecting personal data?
To stop Windows 10 from collecting your personal data, you must turn off the “Diagnostics Tracking Service”. To do this follow the steps given below.
1) Open Windows 10 Settings by clicking the Settings menu from the Start menu, then select the “Privacy” option.
2) In the Privacy Settings window, select the “Diagnostics and Feedback” tab menu from the left sidebar. This will open the “Diagnostics and Feedback” section on the right pane.
3) Select the “Required diagnostic data” option from the “Diagnostic data” section, which will disable the “Improve inking and typing” option.
4) In addition, you can turn off the rest of the toggle buttons at the bottom, which will disable the “Tailored experience” and “View diagnostic data” options, respectively. This will prevent Windows System from using your diagnostic data to offer you personalized tips, ads, and recommendations.
5) If you want to delete the diagnostic data that Microsoft has collected so far, simply click on the “Delete” button from the “Delete diagnostic data” section. You can then optionally select “Never” from “Feedback frequency” to finish this step.
How do I stop Windows 10 from asking for feedback?
To stop Windows 10 from asking for feedback, just follow these steps.
1) Launch Windows 10 Settings by clicking the Settings menu from the Start menu, then select the “Privacy” option.
2) In the Privacy Settings window, select the “Diagnostics and Feedback” tab menu from the left sidebar. This will open the “Diagnostics and Feedback” section on the right pane.
3) You can then select “Never” from “Feedback frequency” to prevent Windows 10 from asking for feedback.
How do I delete diagnostic data in Windows 10?
To delete diagnostic data in Windows 10, simply follow these steps.
1) Launch Windows 10 Settings by clicking the Settings menu from the Start menu, then select the “Privacy” option.
2) Then select the “Diagnostics and Feedback” tab menu from the left sidebar to open the “Diagnostics and Feedback” section on the right pane.
3) Now just click on the “Delete” button from the “Delete diagnostic data” section to delete all the diagnostic data collected by Microsoft.
How do I clear activity history in Windows 10?
To delete all activity history in Windows 10, follow the steps given below.
1) Open Windows 10 Settings by clicking the Settings menu from the Start menu, then select the “Privacy” option.
2) Then select the “Activity history” tab menu from the left sidebar to open the “Activity history” section on the right pane.
3) Now click on the “Clear” button from the “Clear activity history” section at the bottom to delete all the past activities from the Microsoft servers.
How do I reset my Advertising ID in Windows 10?
Follow the steps given below to reset the Advertising ID in Windows 10.
1) Open Windows 10 Settings by clicking the Settings menu from the Start menu, then select the “Privacy” option.
2) Then select the “General” tab menu from the left sidebar to open the “General” section on the right pane.
3) Then from the right pane turn off the first toggle button from the “Change privacy options” section to reset your Advertising ID.
Wrapping Up
So those are the vital Windows 10 privacy settings that you should turn off immediately after installing Windows 10. You can also disable these settings during system setup. As a result, you can use Windows 10 without any worries and Microsoft will not even be able to track your activity and send any ads, and your personal data will be secure. If you found this article useful, enjoy another guide on How-To-Innovative.